My Tennis: Affiliation

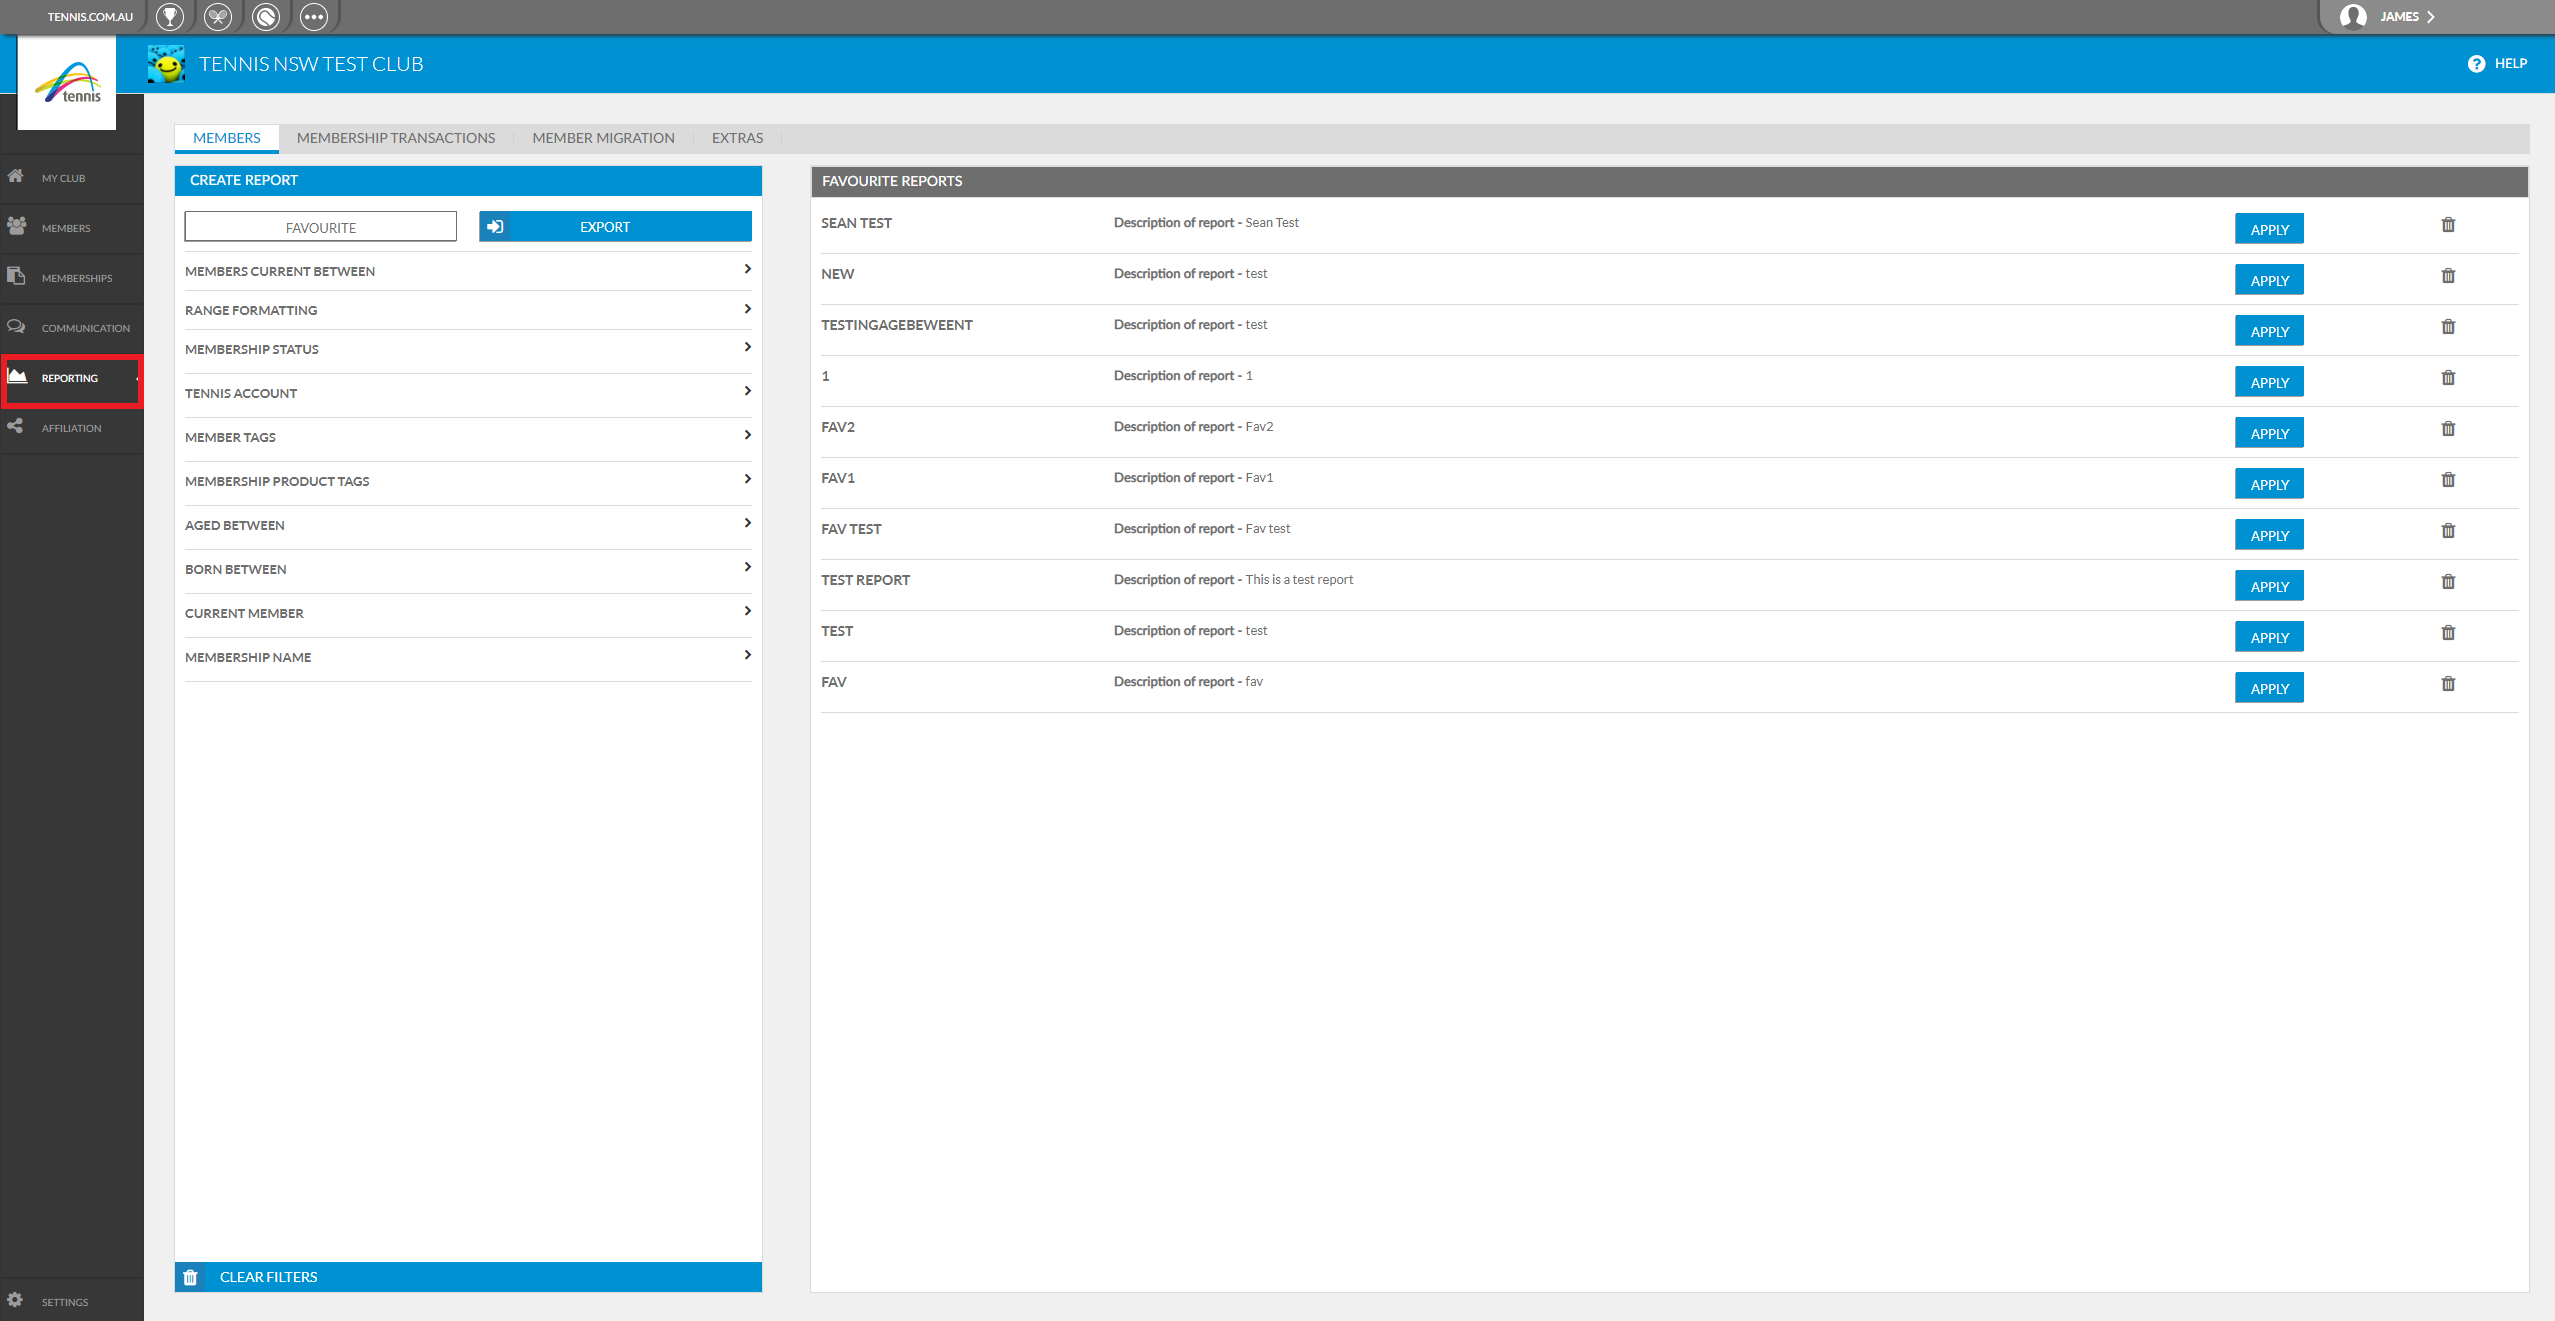
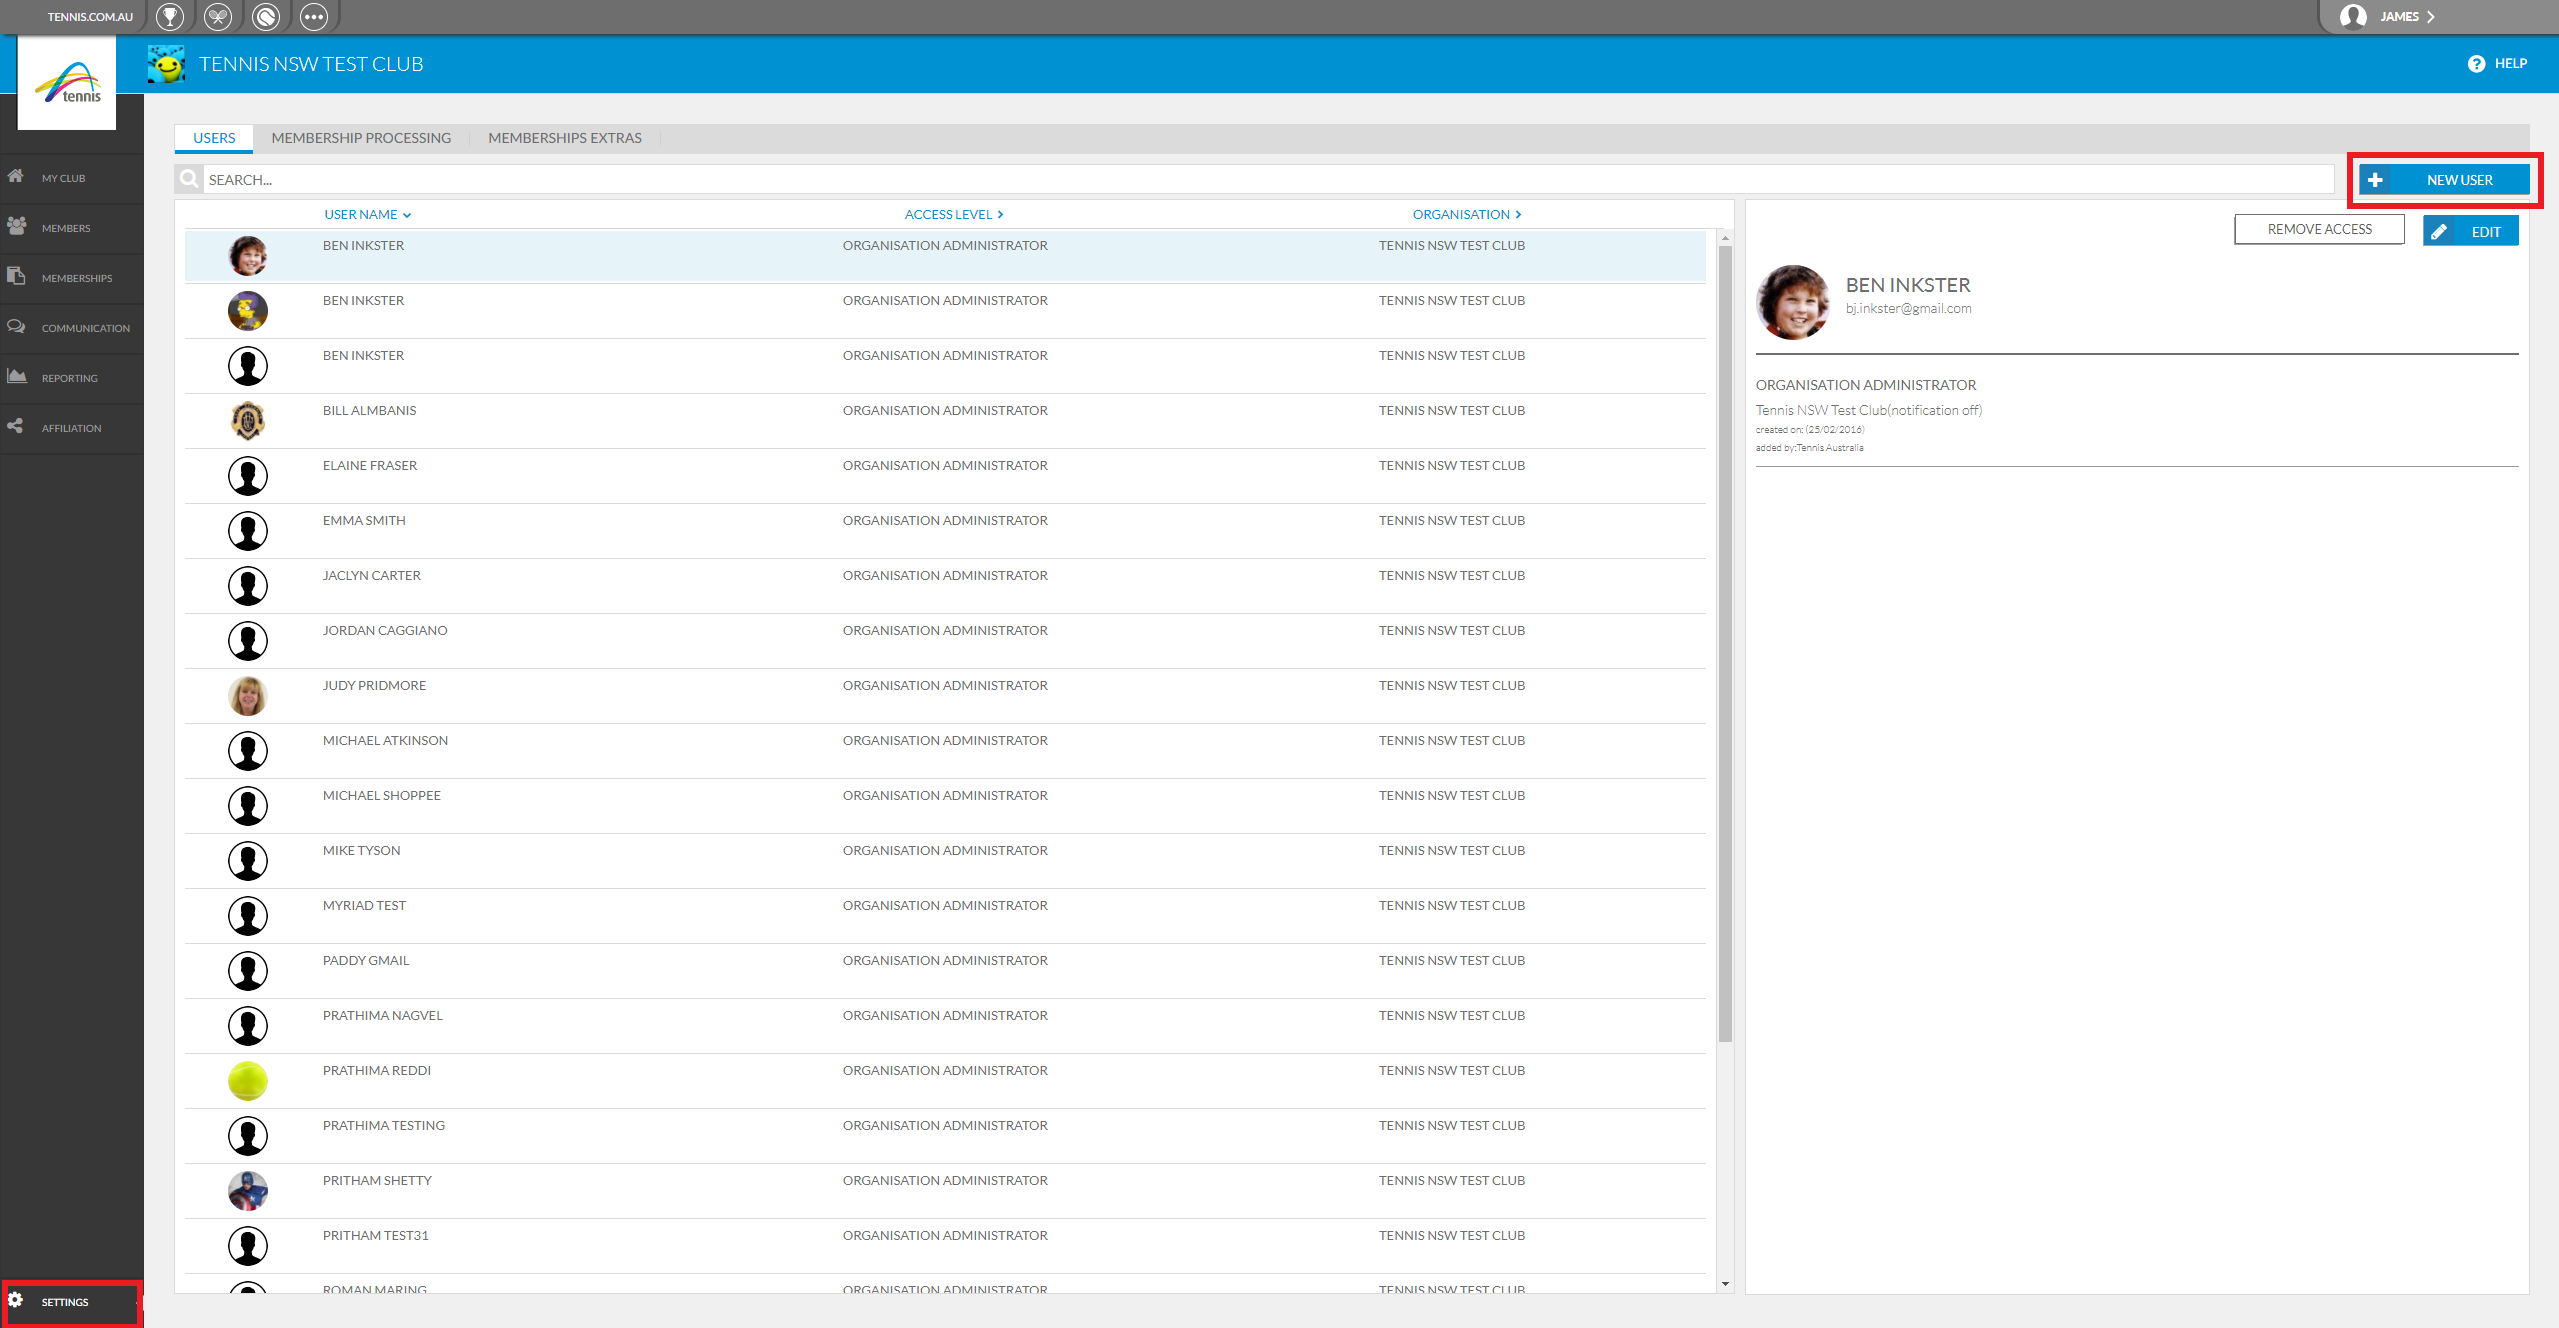
STEP 1 – BEGIN AFFILIATION

To complete your online affiliation renewal log in to my.tennis.com.au

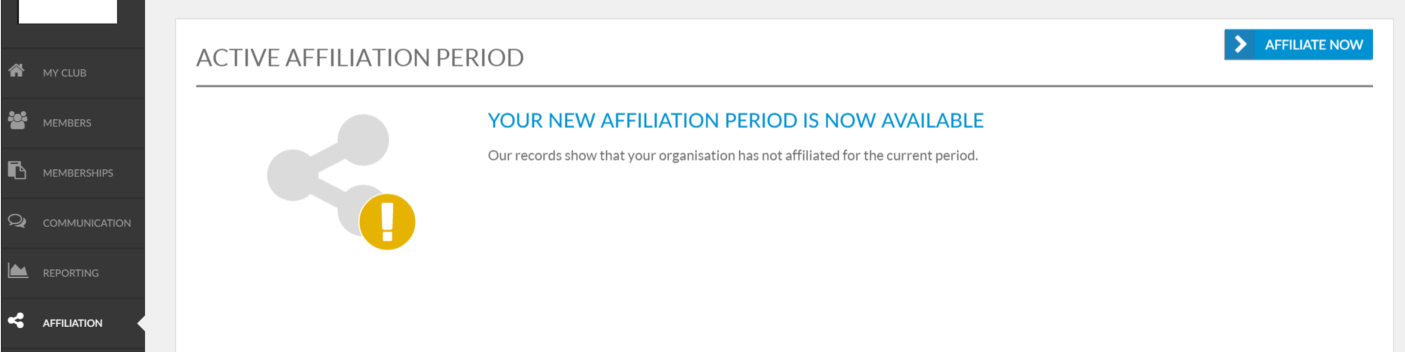
Select the Affiliation tab on the left hand side menu

Then select ‘Affiliate/Re-affiliate Now’ at the top right hand side, as shown below:

step 1

STEP 2 – CONFIRM CONTACT DETAILS

Ensure all the Club contact information, physical and mailing address is all correct and make adjustments where necessary.

step 2

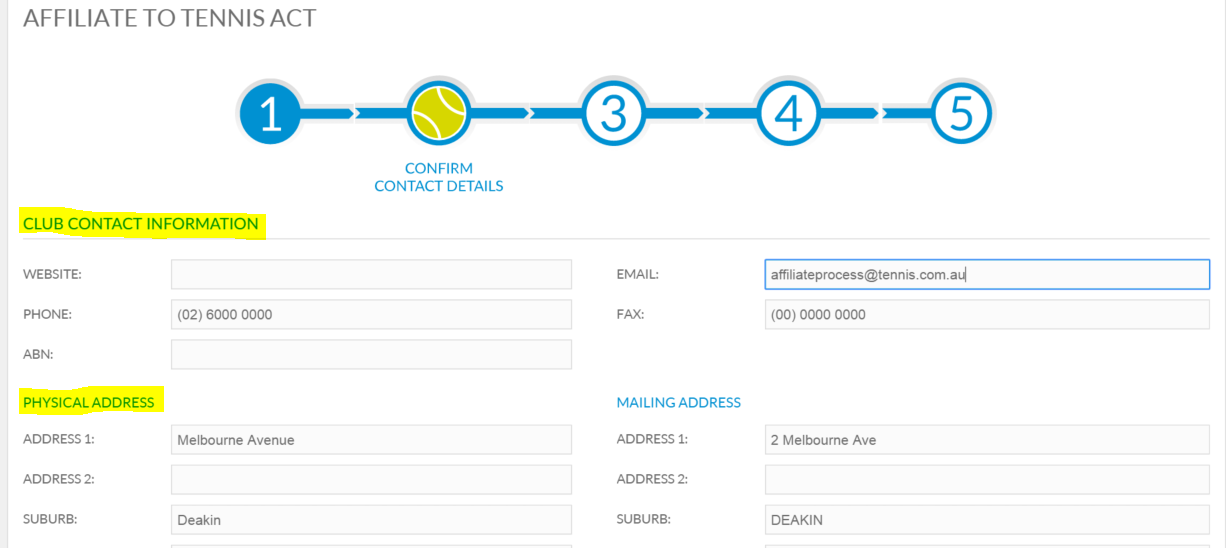
Ensure the clubs key contacts information is correct and make edits where necessary by clicking on the pencil icon. To add a new contact, click the New Contact button.

3

Once all the information on this page is up to date, click Continue. If you need to check information, you can save your work as a draft by clicking Save as draft and come back to continue the process at another time.

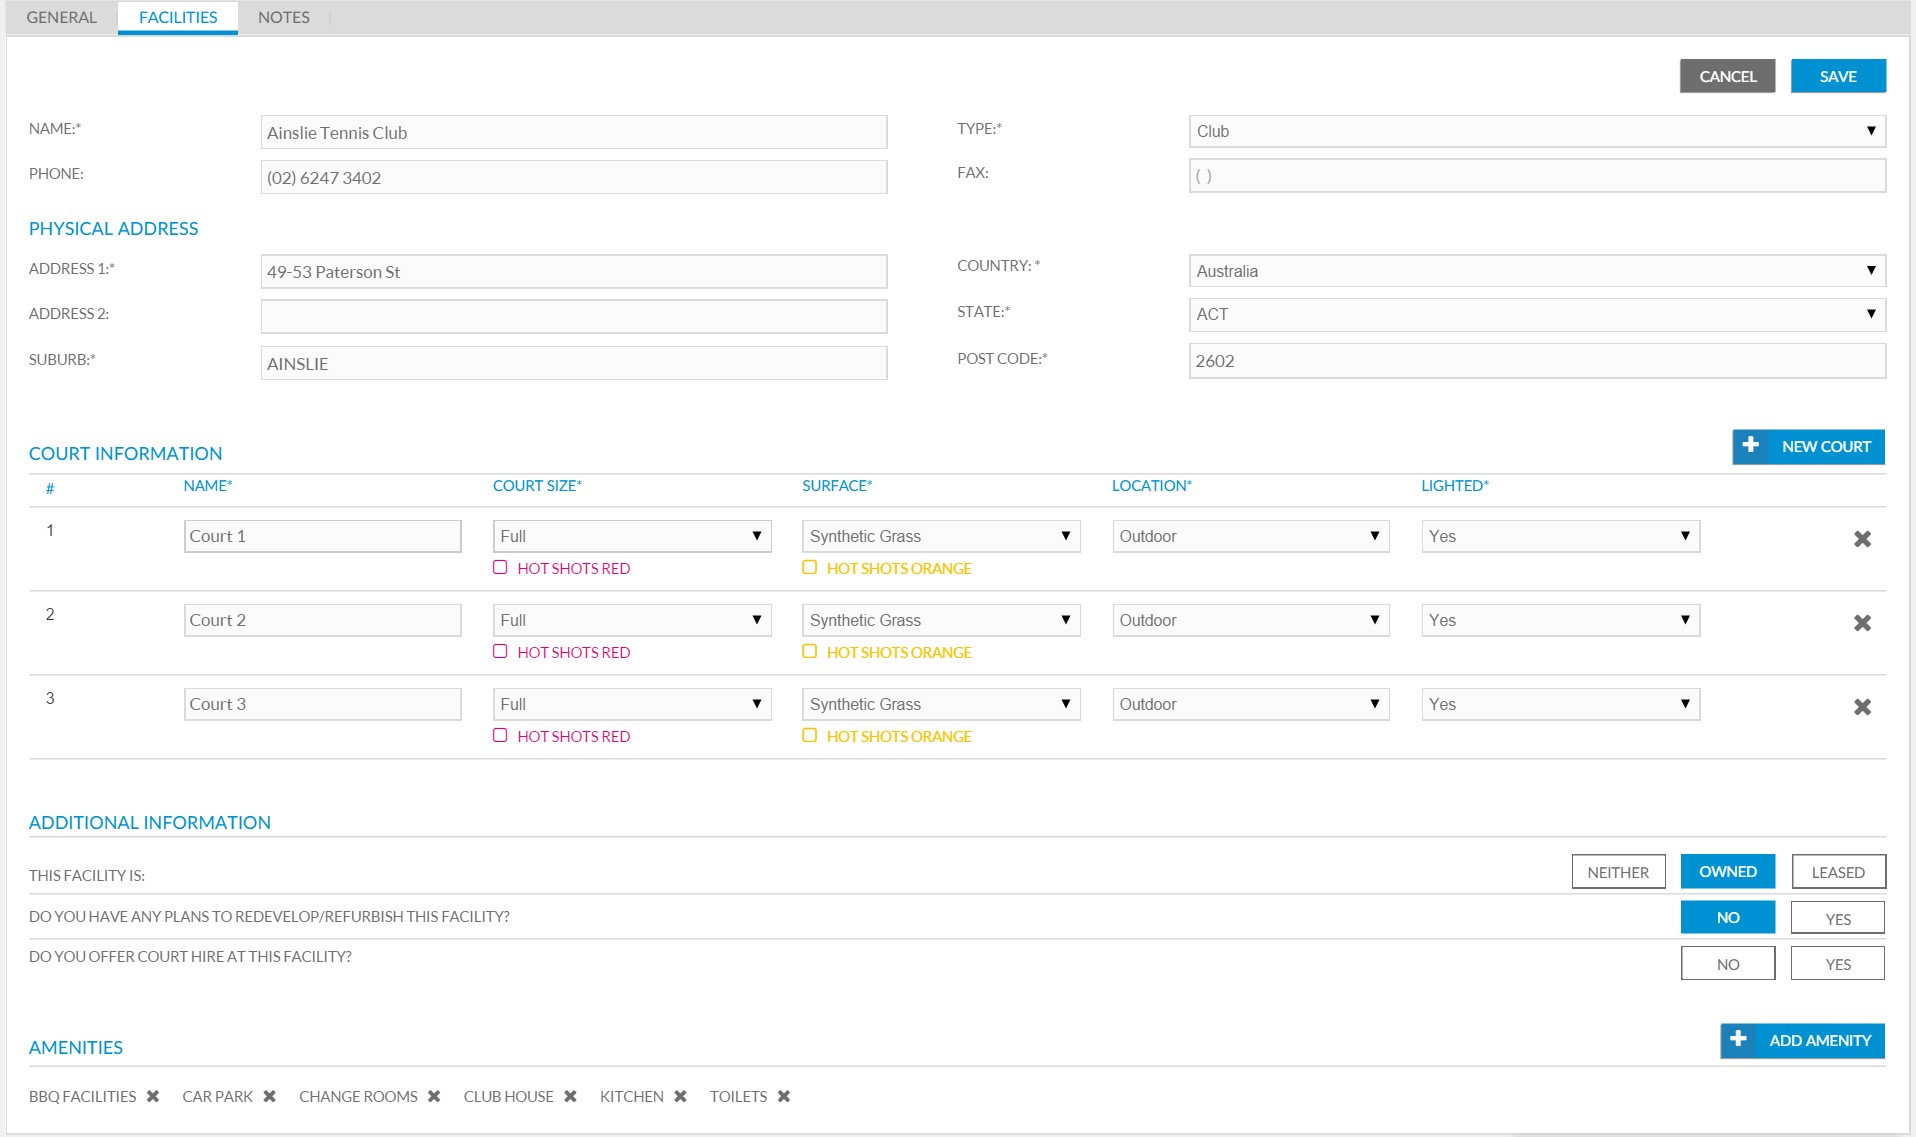
STEP 3 – CONFIRM FACILITIES

Confirm the details of your facilities and make changes where necessary. If you have more than one facility, all will be listed. Click on the facility to view/edit details.

If a facility is missing or you have a new facility to add click New Facility and you will be able to search for it in the database. If you need to remove a facility click Disconnect Facility.

step 3

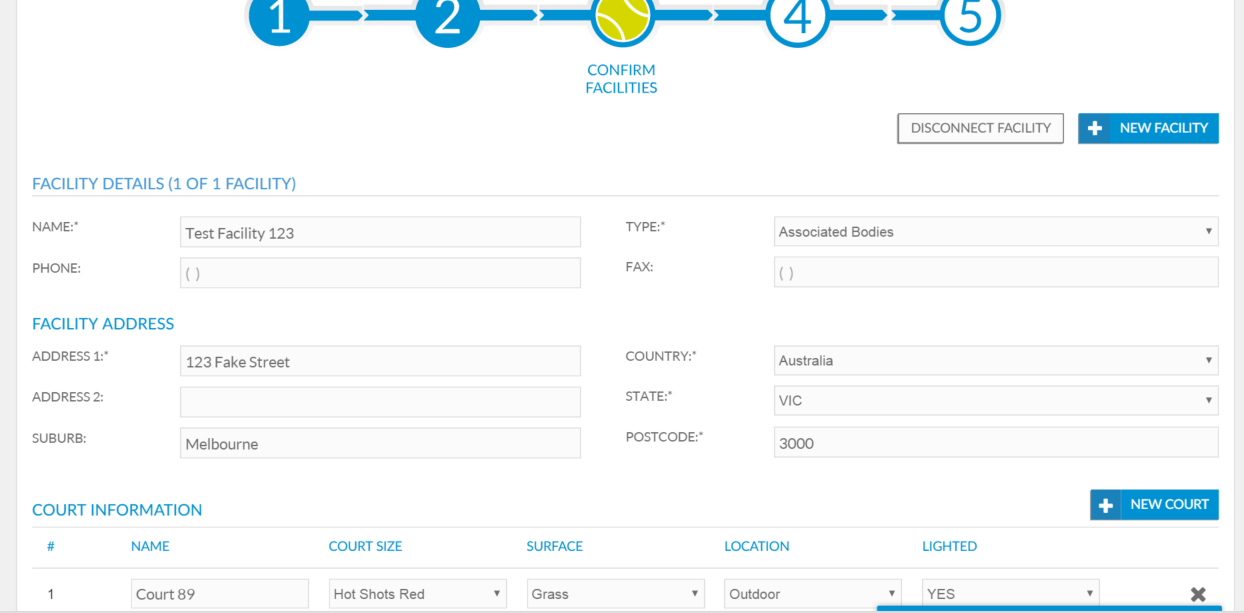
Review and edit court information where necessary, to add a new court, click New Court.

Complete the additional information field by clicking on the answers most appropriate to your facility.

Review and edit amenities where necessary. If you wish to add an amenity (e.g. gym), click Add Amenity. When information on this page is up to date, click Continue. 

STEP 4 – PAYMENT

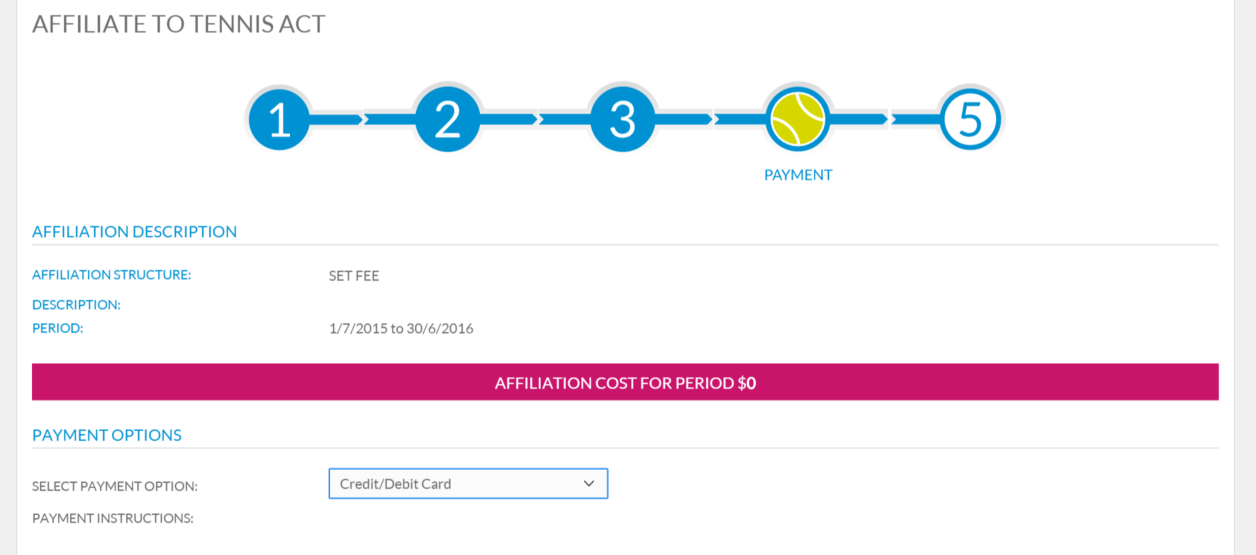
 Check your affiliation cost in the pink banner is correct. If this price is incorrect please contact your Member Association.

Select the appropriate payment option in the drop down menu and select Continue.

step 4

STEP 5 – CONFIRM AFFILIATION

A confirmation of the affiliation process will display, ensure you read the Affiliation Terms & Conditions carefully.

step 5

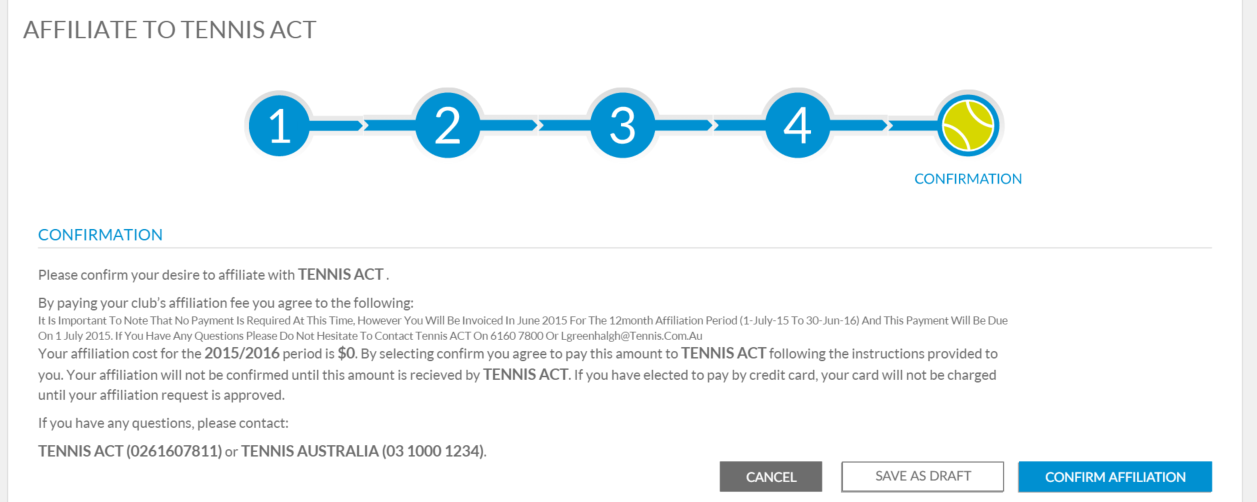
If you are ready to affiliate, select Confirm Affiliation.

Uploading Organisation Specific Terms & Conditions

My Tennis admins have the ability to upload their organisation specific terms and conditions which will provide members with access to this information when they sign up for a membership online.

This feature also allows organisation admins with the option of informing their current members when the terms & conditions have updated/changed.

To upload specific terms & conditions select Settings, then select Membership Processing and click Edit.

Click Yes for ‘Organisation Specific Terms & Conditions’ and then click Upload File. Browse your computer to locate the file and then select ‘Open’.

Org Specific T&C Once your file has been uploaded and it displays as above, click Save.

You will then have the option to notify current members of the changes/updates to the terms & conditions, as shown below:

Notify members of change to T&C

Once you have selected the appropriate option, the terms & conditions will be saved.

If required, Club admins have the ability to download this file, by clicking Download as shown below:

Download T&C

Generate & Filter Reports

To access the reporting tool select Reporting on the left hand side.

The Reporting Tool enables clubs to generate and export the below reports:

Report Description
Members List of selected members (based on filters selected) and their contact information, latest membership details and communication preferences
Transactions List of selected members (based on filters selected) with their appropriate membership information including payment information.
Extras View which members have purchased extras and specific extras transaction information such as quantity and cost.

To access each of the different reports click on the appropriate tab along the top


Report Tool


Filters

Under the Create Report heading for each of the tabs, a list of reporting filters will be displayed. Reporting filters will be modified based on the different reporting headings (Members, Transactions and Extras).

To generate a report:

  1. Use the drop-down boxes to select the appropriate filter type. (Note: not all filters need to be used. If any filters are not included all available options will appear)
  2. Select Export for the data to be generated and an excel spreadsheet will begin downloading.

Filters


Creating Favourite/Saved Reports

If you intend to use the same reporting filters in the future, you can click Favourite and name the custom report accordingly with a brief description.

These saved filters will now appear under your list of Favourite reports so that you can quickly apply the same filters or ranges in the future.

Similar to generating a data extraction, prior to exporting the data, select Favourite and name the custom report accordingly with a brief description.

Favourite Report


The saved filters will be displayed under the Favourite Reports heading.

Favourite Report 1


To generate a data extraction using a custom report, select Apply and alter reporting filters if necessary. Select Export for the data to be generated and downloaded to your computer in the form of an excel spreadsheet.

Filter descriptions

  Report
Filter Description Members Transactions Extras
Range  Select the date/range you would like the report to display for
Range Formatting  Group and sort your report with range formatting. The extracted report will group the report based on the range formatting selected.
Membership Status Specify the status of which members you would like to appear on report
Tennis Account Has this member activated a Tennis Account
Membership Type Is the membership one off payment or re-occuring (on-going monthly payment)
Membership Name Members who display will have purchased selected membership package(s)
Tags Members who display will have selected tag(s) allocated to them or their membership package
Age Range Specify the age range of members who you would like to appear on the report
Payment Method Members who display will have paid with the selected payment method(s)
Extra Members who display will have purchased the selected extra(s)
Fulfilment Status Specify if you would like to view extras that have been fulfilled or not
Unit Price Members who display will have purchased extra(s) between the selected price ranges


Creating Admin Users

Before a club committee member can gain administrative access, a personalised tennis account must be created with a unique email address.  To create a Tennis account go to tennis.com.au and select Join in top right corner

  • Select Settings in the bottom left hand corner of the page and the New User tab in the right hand corner

  • Enter three fields of information and Search for the person

  • Click on the appropriate person and then select Continue

  • In Access Levels from the dropdown box on right hand side select Organisation

  • Toggle the Notifications to ‘Yes’ or ‘No’ and then Save

Create a Tennis Payment Gateway Account

Stripe has been introduced as the online payment gateway for the new MyTennis system.

Focusing on user friendly technology and building great products, Stripe is a suitable payment gateway for Tennis Clubs and Associations around Australia.

For more information about Stripe including step-by-step support guides on how to create/amend a Stripe account, please visit support.stripe.com.

————————————————————————————————————————————————————————————————–


Before you can start receiving online credit card payments for memberships you need to create an account for your Tennis payment gateway.

 Creating an Account

  • Select Settings in the bottom left hand corner of the page
  • Select the Membership Processing tab across the top of the page
  • Select Edit in the top right corner
  • If you scroll down the page you will see the option to in the Payments Settings section Allow online membership purchases, change this from No to Yes

  • Once you are taken to Stripe, select Sign in with Stripe to connect

  • Once taken to the sign in page, if you have an existing Stripe account, login with your email and password, if you don’t have an account, click Don’t have an account? Sign up

  • Follow the prompts in Stripe to create your account
  • Enter all the required details TIP: Enter Non-Profit as the type of business
  • You will need to include information such as
    • Key contact person
    • ABN number
    • Club Bank Details to transfer payments to (in order to receive payments from Stripe)
  • Once you have created your account you may need to activate it by selecting Your Account > Activate Account

Stripe2

  • Save the account

Please note: To cover Tennis Payment Gateway administration costs, TA charges a 3% fee on all online payments. The fee is automatically deducted from each payment.

Add & Edit Facility Information

To view your facility details in My Tennis select My Club then the Facilities tab.  A list of your facilities will be displayed.

Add New Facility

  1. Select Add Facility
  2. Enter the facility address
  3. A list of facilities that may be the same as the entered facility will appear. If the facility already exist please select it and select Add Facility
  4. If the facility does not appear select Create New Facility
  5. Enter the appropriate facility and court details

View/Edit Existing Facility

  1. Select the facility that needs to be edited from the list
  2. The facilities details will be displayed, if changes are required select Edit
  3. Enter the relevant changes to the facility details and address
  4. If required make changes to the court information
  5. To add an additional court select New Court. The new court will appear on the list
  6. Courts will automatically be names Court 1, Court 2…, you can make and changes to each courts information using the drop down boxes to select the appropriate information
  7. Select Save

Add&Edit Facility Information