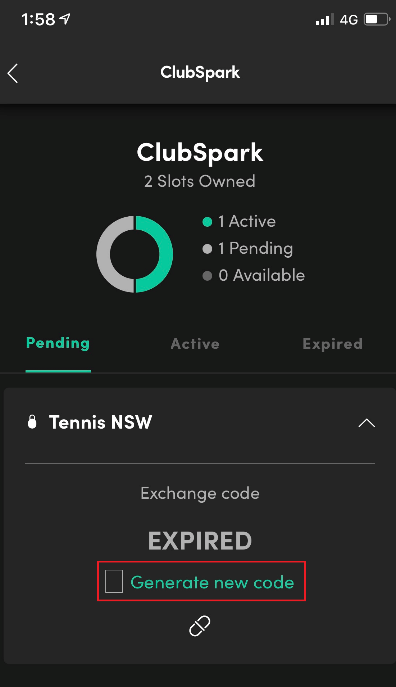
Important Notice: Single sign in now live. For more information Click HERE

Support Centre

Find all the answers to your question

Planned outage to some Tennis Australia systems on 2nd – 4th December.

From 4pm Friday 2nd December until 11pm Sunday 4th December, there will be a scheduled outage to a number of systems utilised by the tennis community. The systems impacted during the outage period are:

  • Tennis Connect – (Tennis id creation/login)
  • MyTennis 2
  • Match Centre / League Manager

Whilst we understand the inconvenience of this necessary outage, it is required to enable Tennis Tech to perform critical works to ensure the security and stability of our systems.

Tournament Planner and the Tournaments website will still be accessible, however please note that players must ensure they have their Tennis ID (number starting 66..) prior to the outage period, as there is no ability to register for a Tennis ID during the outage period.

This scheduled outage will not impact ClubSpark.

If you have any questions regarding the outage prior to 4pm Friday 2nd December, please read on to the FAQ’s below. If your question is not answered by the FAQ’s, please contact the Customer Support team during operating hours: https://support.tennis.com.au/contact-us/


FAQ’s:

When is the outage? Planned Outage Start time : Friday 2-Dec-2022 // 16:00 Hrs
Planned Outage end time :  Sunday 4-Dec-2022 // 23:00 Hrs
Why was this timing chosen? The scheduled outage impacts a wide range of platforms and services provided by Tennis, and after significant planning across our team and 3rd parties, these dates are the best period to complete the required works.
League Manager/Match Centre, Tennis ID & MyTennis2
Will I be able to login MyTennis 2, League Manager/Match Centre? No.
Will I be able to create/register for a Tennis ID and complete my competitive player profile? No.

The Tennis ID and account creation portal will not be accessible during the outage period.

Players attempting to complete their competitive player profile and activate their UTR Rating via Match Centre will not be able to do so until after the outage period.

Will I be able to administer my league/teams via League Manager? No.

The outage will prevent any access to League Manager.

All related administration via League Manager (e.g. entering scores, printing scorecards, adding players to teams, team nominations etc.) will be accessible and continue as normal once the outage period is complete.

Please ensure that relevant match results are entered following the outage period.

Will I be able to view my matches via Match Centre? No.

The outage will prevent any access to Match Centre.

Please ensure that you note your upcoming match time, location, format and playing order prior to the outage period. Additionally if required, print your match scorecard prior to the outage.

Will I be able to view enter scores via Match Centre? No.

The outage will prevent any access to Match Centre.

Match scores will be required to be entered following the outage period.

Will MyTennis2 be accessible for reporting or any other purpose? No.

The outage will prevent any access to MyTennis2.

What is the impact on my UTR? During the outage period, no match results can be entered in League Manager/Match Centre. Once match results are entered and confirmed following the outage period, eligible results will be reflected on your Universal Tennis profile within 72 hours of the time of confirmation.

Trouble with your Log In

You might have issues logging in after creating an account at your Club.


1.

You might have forgotten the way you signed up the first time.

  • If you’ve lost your password, click on Forgotten your password and follow the procedure to retrieve your password
  • If you don’t remember your email address you registered with, please email or call your club to ask which email address is assigned to your profile (⚠️ do not create a new account, as you will lose all the settings, bookings and memberships assigned to your original account)


2.

If you’ve managed to log in but:

  • your account looks different,
  • you’ve lost your original settings or data,
  • you cannot pay for a membership or court bookings,

It might be because you’ve used the wrong log in details…Your club admin should be able to retrieve those details and, let you know if you’ve used a duplicate log in, using their system Contacts module.


Admin View in Contacts
(after clicking on the member profile)


In most cases, if you’re having doubt or trouble with logging in, please ask your club admin to look for your log in details or send you an invite link if you haven’t created an account already.


Note for club admins: If a member has, by mistake, created a duplicate record, please refer to this support guide to merge the duplicates.


Need more help? Contact Customer Support on 1800 752 983 or email [email protected]

League Manager Update – Friday 23 September

We are excited to announce new functionality is being added League Manager, with a new League Manager player, team, club and competition search tool for administrators to be released Friday 23 September.

The System Search tool will allow administrators access to competition information across the country to assist in administration and provide increased access to player, team and competition information.

The League Manager System Search includes the ability to search:


Players

  • Search and view any player in League Manager/Match Centre
    • View their current competition and latest team
    • View individual player ratings, results and statistics by year and/or competition


Organisations & Teams

  • Search and view any organisation and teams, in League Manager/Match Centre
    • View an organisation, the number of current active teams, and all historical teams
    • View any team’s competition, ladder position, fixtures and results, plus team statistics
    • View the Teams players, ratings, and order of merit (if applicable to the competition)


Competitions

  • Search and view any competitions that are administered on League Manager/Match Centre
    • View any organisations current active competitions, or historical competition information
    • View all associated competition data, such as; fixtures and results, ladders, teams and player statistics


The System Search can be accessed via the League Manager side-menu bar under ‘System Search’.

Note: data cannot be modified using the search tool, as the search tool’s purpose is to provide read only access to information.


Support Guides

For more detailed feature and user guide information on the League Manager System Search tool, please visit the League Manager product knowledge base on support.tennis.com.au. Alternatively, when logged in to League Manager click ‘Support’ on the menu bar to access WalkMe which provides step-by-step instructions and guidance for a range of League Manager tasks.


  • Direct access to the League Manager System Search user guide is HERE.


Don’t see the LM System Search in your LM side menu on release day? Please ensure that you have logged out of League Manager, cleared your browsers cache/history, and then logged back in. If required, support information on how to clear browser data can be found HERE.


If you do encounter any issues, simply require some assistance, please contact Customer Support via 1800 PLAY TENNIS (1800 752 983) or email [email protected].


Are you an association or club administrator interested in using League Manager (Tennis Australia’s free online competition management system) for your competitions? Please click HERE for more information.

Add & Edit Your Venue Consents

Platform/Product/Module: ClubSpark – Profile
Function: How to add consents (Marketing opt ins, newsletter, club’s comm, photography rights, etc.)


The ClubSpark platform allows you to create up to 10 consents which you can ask your members to opt-in or out of when they register to your venue for the first time.

The consents follow privacy compliance and are ‘Opt-in’. Consents can be changed by the user on their own profile page, you can send our Changing Consents guide to your members if they would like to change what they have opted-in or out of.


This guide will provide steps for the following:

  • Adding A New Consent
  • Editing Consents


Adding A New Consent 


1.

To add consents to your account, you will first need to head to Profile, here you will need to click on the ‘Consents‘ tab situated in the top right corner underneath your name.

Once you have clicked on the ‘Consents‘ tab, you should be taken to the following page:


Here you will be able to edit/enter your own introduction text such as: “Occasionally, [Club’s Name] may also use your details to:” (limited to 100 characters)


2.

Below, you will be able to enter your up to 10 consents by clicking on the ‘Add New Consent‘ button


3.

The following overlay should appear:


Here you will be able to enter your consent name in Label Text and what the member will be opting-in or out of in Descriptive Text.
Before clicking the blue ‘Save Consent’s button, remember to tick ‘Enable This Consent‘.


4.

Your new consent will now be visible when someone registers to your venue for the first time and within their member’s profile to opt-in or out of.


Editing Consents


You may already have consents set up that are no longer needed on your account, below are the steps in how you can edit, disable or delete your consents.

Please Note:  If a consent has been opted-in or out of you will not be able to edit the text, you will only be able to disable it and delete it.


Editing or Disable a Consent

1.

Once you are within the Profile module in the admin area and looking at your consents, click on ‘Edit


2.

The following overlay will appear:

Here you will be able to disable the consent, change the label and description text.

Note: Once you have disabled this consent by ticking the toggle button to grey, it will no longer appear as a consent to your members to opt-in or out of. If you wish to re-enable to consent, you will need to click the toggle again to turn back to blue.


3.

Once you are happy with the changes, remember to click the blue ‘Save consents‘ button in the bottom right corner of the overlay.


Deleting A Consent

1.

Once you have disabled a consent, you will be able to delete it.

To do that You will need to click on the ‘Delete‘ button next to the consent that you wish to remove.


2.

The following overlay will then appear:

Here you will need to confirm that you want to permanently delete this consent.


3.

Once you have ticked the confirmation box, you will then need to click the blue ‘Delete Consent‘ button.


Need more help? Contact Customer Support on 1800 752 983 or email [email protected]


— Get started with Memberships

The Membership Module allows you to promote your memberships online, accept online payments and connect with your members via single and group emails.

Your first step is to head to the Membership Module within the admin area of your ClubSpark account – on the left-hand side of the screen.

mceclip1.png

League Manager & Match Centre Update – Thursday 2 June

Please note the following release updates to League Manager and Match Centre on Thursday 2 June, which includes the following:

League Manager

  • When adding a new player to team/competition, search for a player using their Tennis ID
  • Error messages have been updated to assist administrators in resolving the problem to be rectified in the process/task being completed
  • Tennis ID references in reporting outputs
  • User profile menu updated to show user role, Tennis ID, settings and view received League Manager communications


Match Centre

  • On desktop view only, when the number of Rounds in a competition exceeds 16 Rounds scroll forward/back arrows will be visible to easily access all rounds.

Please ensure that you clear browser cache following system updates.

Support Guides
Updated support guides for both League Manager and Match Centre can be found here:


If you have any questions please don’t hesitate to contact our friendly team on 1800 PLAY TENNIS (1800 752 983) or email [email protected]


Are you an association or club administrator interested in using League Manager (Tennis Australia’s free online competition management system) for your competitions? Please click HERE for more information.


League Manager & Match Centre Update – Thursday 12 May

Please note the following release updates to League Manager and Match Centre on Thursday 12 May, which includes the following:

League Manager

  • Nominated Teams page updated to better assist competition administrators in viewing/managing teams during nominations period
  • Add Team page updated to provide further competition details when creating/nominating a team (e.g. competition start date, registration closing date, participation fee etc.)
  • All Ratings displays for players will now show the UTR Rating values. For example; Team Profile players list now shows UTR Ratings
  • A Ball Type is now a required field when setting up a competition, and is an editable field division settings. Ball Type must be set as either; Red, Orange, Green or Yellow.
  • When setting up a competition and/or updating a division, competition administrators may add UTR Rating Bandwidths labels to divisions to indicate the playing standard.
  • Ball Type and UTR Rating Bandwidths information will be visible on competition/division profiles
  • The following reports have been updated to include Ball Type in the report output:
    • Leagues & Divisions Created
    • Organised Leagues & Divisions
    • Team Grading Information
    • League Champions Report
    • Teams Overview
    • Player Statistics by League
  • Minor bug fixes


Match Centre

  • The required ball type for a competition will appear in the division profile page
  • The required ball type for a match can be seen in the Match Details section and on the printed scorecard.
  • UTR Rating Standards for a competition/division can be viewed on the competition/division profile
  • Ball Type and UTR Rating Bandwidth information will be visible when registering to a competition/division.
  • Filter competitions by the Ball Type when viewing an organisations leagues
  • When entering a result and adding a new player, search for a player using their Tennis ID
  • Minor bug fixes

Please ensure that you clear browser cache following system updates.

Support Guides

Updated support guides for both League Manager and Match Centre can be found here:


If you have any questions please don’t hesitate to contact our friendly team on 1800 PLAY TENNIS (1800 752 983) or email [email protected]

Are you an association or club administrator interested in using League Manager (Tennis Australia’s free online competition management system) for your competitions? Please click HERE for more information.

Newsletter in ClubSpark

Platform/Product/Module: ClubSpark – Contacts or Memberships
Function: Send Newsletters to players at your Club


In ClubSpark, it’s not possible to create an automated newsletters that are being sent regularly to certain users… Also, ClubSpark currently limits the size of the files and images that can be attached to an email…

However, the right admin at the club can jump into the contact module or membership module and email a link to a newsletter page your club has created to relevant members at the club.


Set up the news article:


1.

Once you’ve added the News page to your website, Click Add new article


2.

Click Show in public listing (either now or later when they’re ready to publish)
Choose a Page titleCategory (Club, Social, Competition, Coaching) and add the Published date.


3.

Add a listing summary (summary description that will appear on their website for the news article).
Add a photo for the listing if you wish – recommended.


Create the Newsletter hyperlink on your news article


1.

Type some text or insert an image into the Page text Field (this will be the ‘anchor’ they link the PDF (newsletter, other document) to.


2.

Select the image or text in the text box and click the link symbol in the top bar.


3.

Set the link type as URL, and change Protocol to HTTPS://


4.

Click Browse Library.
In your File Library select either Files or Documents (doesn’t matter which of these, this is where you’ll save the PDF)


5.

Click Upload or +Add Files. Then navigate to where you have saved the newsletter / PDF on your computer.


6.

Double click your PDF/ Newsletter document and it will begin to automatically upload to either the Files or Documents folder in ClubSpark.

When the upload has finished. Double click the file. You’ll see the system adds the URL automatically.

7.

Click OK and click Save page changes.


Send the Newsletter by email


1.

The only thing left to do is to send the newsletter by email to the relevant person.
To do this you can either use the contact module and filter by consent, tags or names or use the membership module and filter by membership package.


2.

Once you’ve applied the right filters, select all by clicking the tick box at the top and click the mail icon.


3.

A pop up will appear.
Make sure you’ve ticked Include unregistered (this just means that you will include those who haven’t created an account in ClubSpark yet, but have given you their email address) and do not forget to copy & paste the website link of your newsletter article in the the text box.


4.

Once you’re done, click Send.


Need more help? Contact Customer Support on 1800 752 983 or email [email protected]

League Manager & Match Centre Update – Thursday 31 March

As the 2021/22 summer season of Tennis comes to a close, the rollout of the new Competitive Play Framework and transition to the UTR Rating for Australian tennis continues.

The following release is essential to ensuring a smooth transition to the 2022/23 summer season.

As of 31 March 2022, League Manager and Match Centre users will notice a change to the ratings display. The change is an important step in moving towards the new Competitive Play Framework and transition to a UTR Rating which comes into full effect on 1 October 2022, prior to the commencement of the 2022/23 summer season.

In that regard, please note the following updates to League Manager and Match Centre to be released on Thursday 31 March, which includes the following:


League Manager

  • The UTR Rating will replace the TA Rating displays, such as but not limited to; player profiles, team profiles, nominations, player search, statistics display, scorecard views etc.

       Note: the TA Rating will be available in selected League Manager reports during the transition period. The reports include: Player Grading Report, Weekly Ratings Comparison, Statistics reports and others

  • A new Player Grading Report using the UTR Rating only has been added to the League Manager reporting suite
  • UTR Ratings value added to the Custom Report output fields
  • Minor bug fixes


Match Centre

  • The UTR Rating will replace the TA Rating displays on; team profiles, competition registration summaries and scorecard views

       Note: The TA Rating remain visible on player dashboards until the end of the 2022 winter season.

  • Minor bug fixes


If you have any questions please don’t hesitate to contact our friendly team on 1800 PLAY TENNIS (1800 752 983) or email [email protected]

Are you an association or club administrator interested in using League Manager (Tennis Australia’s free online competition management system) for your competitions? Please click HERE for more information.

6 – Upload Files & Images (+ Create clickable text links)

Platform/Product/Module: ClubSpark – Website
Function: How to upload images & link texts to a file or another webpage (hyperlinks)


You have the ability to upload images and create clickable text linking to a file you’ve created or a specific URL to the pages of your website.
You can upload as many images, GIFs and downloadable documents as you desire, through your website module.

Note:
We advise the size of each files to be less than 1MB… It will prevent your website of being slow to open pages. The file library has a limit of 10mb per file.
To reduce your image sizes you can use platforms like TinyPNG – Compress WebP, PNG and JPEG images intelligently


Add An Image or a GIF (Example of a dummy tennis venue website: ClubSpark / Demo Club Test / Home Page)


1.

Head to your Website module in your admin area, head to a content panel and select the picture icon


2.

From here you can Browse your desktop library and upload any images from your computer.


 Screen_Shot_2018-07-11_at_15.21.44.png


3.

Select ‘Upload‘ to upload the images you wish to use. All uploaded images will be stored here in the file manager.

Note:
There are no limit in the amount of images you can upload at once. However the only supported formats are: PNG, JPG, GIF


Screen_Shot_2018-07-11_at_15.22.09.png


4.

If needed you can resize and edit your images here after you have uploaded them by selecting the image you want to edit and click Edit. 


5.

Double click on the image when you are happy with the edit. You can still amend the Width and Height of the image in the next step.


Screen_Shot_2018-07-11_at_16.38.30.png


6.

Once you’ve made all the necessary changes click ‘OK‘ and do not forget to Save page changes.


Add A File or Link to another Webpage (E.g. ClubSpark / Demo Club Test / January 2022 Newsletter)


This can be useful to:

  • Share a Form or Survey your members need to complete
  • Link your T&Cs to a page in your website
  • Direct users on your homepage to another page in your website
  • Direct your website users to another website (sponsors for example)


1.

Select the text that you would to link and click on the link icon.


2.

Select ‘Browse library‘ to upload a file/document from your computer or enter a link to a specific web page in the URL section.


Screen_Shot_2018-07-12_at_15.50.39.png


3.

If there are  no files currently in your library folder – you can add these by using the ‘drag & drop’ function from an open folder on your computer.
Once the file is added to your library click on it so that it is highlighted as shown below.


Screen_Shot_2018-07-12_at_15.36.09.png


Note:
There are no limit in the amount of files you can upload at once. However .ZIP files are not supported!


4.

Double click on the document/file to create a clickable hyperlink that will open that file once a user click on the text selected and click OK.
The text should then appear to be underlined and in blue (see image below)


Screen_Shot_2018-07-12_at_15.35.11.png


5.

Once you’ve created the hyperlink to a file or another webpage do not forget to Save page changes.


Need more help? Contact Customer Support on 1800 752 983 or email [email protected]